1. First of all Download ProRat. Once it is downloaded right click on the folder and choose to extract it. A password prompt will come up. The password will be "pro".
- Download Here
2. Open up the program. You should see the following:

3. Next we will create the ProRat Trojan server. Click on the "Create" button in the bottom. Choose "Create ProRat Server".
 4. Next put in your IP address so the server could connect to you. If you don’t know your IP address click on the little arrow to have it filled in for you automatically. Next put in your e-mail so that when and if a victim gets infected it will send you a message. We will not be using the rest of the options.

5. Now Open General settings. This tab is the most important tab. In the check boxes, we will choose the server port the program will connect through, the password you will be asked to enter when the victim is infected and you wish to connect with them, and the victim name. As you can see ProRat has the ability to disable the windows firewall and hide itself from being displayed in the task manager.
Here is a quick overview of what they mean and which should be checked:

6. Click on the Bind with File button to continue. Here you will have the option to bind the trojan server file with another file. Remember a trojan can only be executed if a human runs it. So by binding it with a legitimate file like a text document or a game, the chances of someone clicking it go up. Check the bind option and select a file to bind it to. A good suggestion is a picture or an ordinary text document because that is a small file and its easier to send to the people you need.

7. Click on the Server Extensions button to continue. Here you choose what kind of server file to generate. I prefer using .exe files, because it is cryptable and has icon support, but exe’s looks suspicious so it would be smart to change it.

8. Click on Server Icon to continue. Here you will choose an icon for your server file to have. The icons help mask what the file actually is. For my example I will choose the regular text document icon since my file is a text document.
 9. After this, press Create server, your
server will be in the same folder as ProRat. A new file with name "binded_server" will be created. Rename this file to
something describing the picture. A hacker could also put it up as a torrent pretending it is something else, like the
latest game that just came out so he could get people to download it.
Very important: Do not open the "binded_server" file on your system.
10. You can send this trojan server via email, pendrive or if you have physical access to the system, go and run the file. You can send this file via email as "server.exe", by using fake email sender http://emkei.cz/. Or Password protect this file with ZIP and then email it. Once your victim download this ZIP file, ask him to unlock it using ZIP password. When the victim will double click on the file, he will be in your control.
11. Now, I will show you what happens when a victim installs the server onto his computer and what the hacker could
do next.
Once the victim runs the server on his computer, the trojan will be installed onto his computer in the background. The hacker would then get a message telling him that the victim was infected. He would then connect to his computer by typing in his IP address, port and clicking Connect. He will be asked for the password that he made when he created the server. Once he types it in, he will be connected to the victims computer and have full control over it.

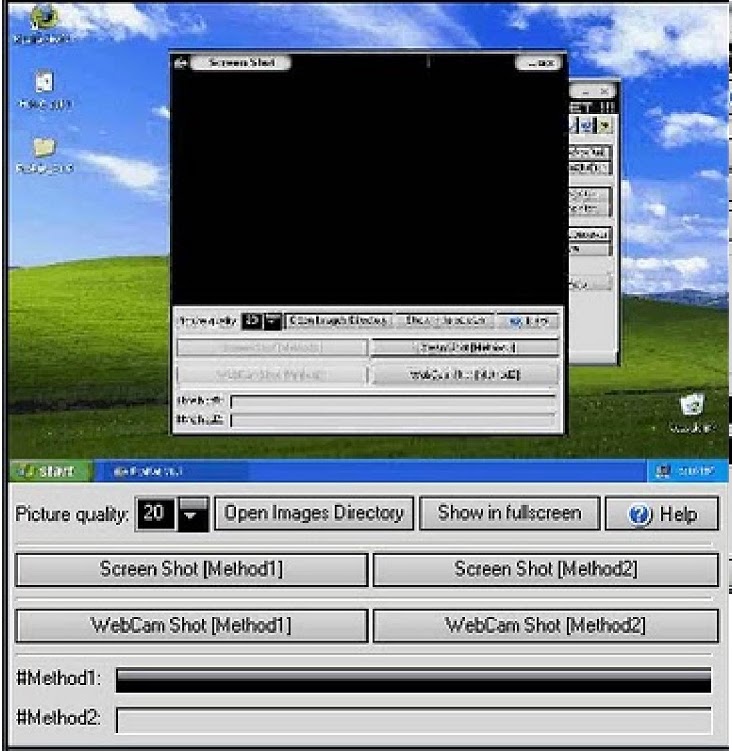
12. Now the hacker has a lot of options to choose from as you can see on the right. He has access to all victim's computer files, he can shut down his pc, get all the saved passwords off his computer, send a message to his computer, format his whole hard drive, take a screen shot of his computer, and so much more. Below I’ll show you a
few examples.

13. The image below shows the message that the victim would get on his screen if the hacker chose to message him.
 14. Below is an image of what the hacker would see if he chose to take a screen shot of the victims screen.

As you saw in the above example, a hacker can do a lot of silly things or a lot of damage to the victim. ProRat is a very well known trojan so if the victim has an anti-virus program installed he most likely won’t
- Download Here
2. Open up the program. You should see the following:

3. Next we will create the ProRat Trojan server. Click on the "Create" button in the bottom. Choose "Create ProRat Server".


5. Now Open General settings. This tab is the most important tab. In the check boxes, we will choose the server port the program will connect through, the password you will be asked to enter when the victim is infected and you wish to connect with them, and the victim name. As you can see ProRat has the ability to disable the windows firewall and hide itself from being displayed in the task manager.
Here is a quick overview of what they mean and which should be checked:

6. Click on the Bind with File button to continue. Here you will have the option to bind the trojan server file with another file. Remember a trojan can only be executed if a human runs it. So by binding it with a legitimate file like a text document or a game, the chances of someone clicking it go up. Check the bind option and select a file to bind it to. A good suggestion is a picture or an ordinary text document because that is a small file and its easier to send to the people you need.

7. Click on the Server Extensions button to continue. Here you choose what kind of server file to generate. I prefer using .exe files, because it is cryptable and has icon support, but exe’s looks suspicious so it would be smart to change it.

8. Click on Server Icon to continue. Here you will choose an icon for your server file to have. The icons help mask what the file actually is. For my example I will choose the regular text document icon since my file is a text document.
 9. After this, press Create server, your
 server will be in the same folder as ProRat. A new file with name "binded_server" will be created. Rename this file to
something describing the picture. A hacker could also put it up as a torrent pretending it is something else, like the
latest game that just came out so he could get people to download it.
Very important: Do not open the "binded_server" file on your system.
10. You can send this trojan server via email, pendrive or if you have physical access to the system, go and run the file. You can send this file via email as "server.exe", by using fake email sender http://emkei.cz/. Or Password protect this file with ZIP and then email it. Once your victim download this ZIP file, ask him to unlock it using ZIP password. When the victim will double click on the file, he will be in your control.
11. Now, I will show you what happens when a victim installs the server onto his computer and what the hacker could
do next.
Once the victim runs the server on his computer, the trojan will be installed onto his computer in the background. The hacker would then get a message telling him that the victim was infected. He would then connect to his computer by typing in his IP address, port and clicking Connect. He will be asked for the password that he made when he created the server. Once he types it in, he will be connected to the victims computer and have full control over it.

12. Now the hacker has a lot of options to choose from as you can see on the right. He has access to all victim's computer files, he can shut down his pc, get all the saved passwords off his computer, send a message to his computer, format his whole hard drive, take a screen shot of his computer, and so much more. Below I’ll show you a
few examples.

13. The image below shows the message that the victim would get on his screen if the hacker chose to message him.

get infected.Many skilled hackers can program their own viruses and Trojans that can easily bypass
anti-virus programs. But there is still an anti prorat which help to detect the sever file and delete it
to download anti prorat click here


.jpg)


